!Hello guys! !Here Sn2ckerspup!
!In a new post today!
In which I bring to the blog a new episode of "Tutorials". The first episode in this year 2020.
This time it is a special episode for those who want to be bloggers or if you are already a blogger they are things that will probably help you improve your website. Here I leave you three easy tutorials to start with your CPRewritten blogs or any other game. 
Let's start:

1) How to take a photo to the game screen from your computer and then crop the image
This is the easiest of all. It will serve to publish your post in your blog with images. 

This tutorial is for those young children who want to save memories in the game. While for other beginners in capturing images or who do not know how to do it, it will be useful if they want to be bloggers or use it for all kinds of things. 

Requirements:
- Have the program that is installed by default on the computer called Paint.

Now to take a photo in the game you do the following:
- Starts section in Club Penguin Rewritten.
- Now go to the place you want to take a photo.
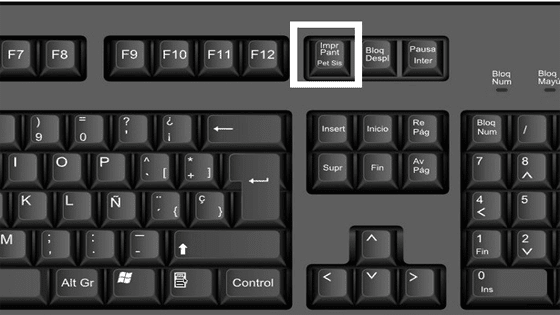
- You click the "Impr Paint" button from your keyboard.

- Open the Paint program on your PC.
- Now click on the option "Paste"
 |
| If you have done everything well so far you will have the image in Paint. |
Now click the right mouse button and hold it down. After this you must pass the cursor around the area you want to select. So you will remove the rest and only the selected area will remain.
 |
To see if what you do is ok. You should see several separate white lines around the image.  |
- Once you have selected the area, you click the right button of your mouse. A series of options will appear. You click on the one that says "Trim/Cut"
 |
| If you have done everything correctly you will have your image ready. It only remains to save it to use it in your post and that's it! |
2) Create your own blog or website in blogger
Having a blog or your own website is definitely something that many want. Unfortunately it is a time when YouTube has won the game against the blogger. Now the majority is dedicated to YouTube, and bloggers have been greatly reduced. Mainly because many prefer to watch videos than read publications. But anyway, it is a matter of your tastes, if you like being a blogger more than a youtuber then this is your tutorial. 
Steps:
1- You must choose between blogger or wordpress, the two main content platforms. If you are a novice, I recommend you much more blogger than I am with and I started. Since it is much easier to edit on this platform. Wordpress is generally slower than blogger. So that is another advantage that this platform has over Wordpress. 
Requirements:
- Have a gmail account.
- Sign up in www.blogger.com
- Now you click "Start", the first thing you will do is choose the name of your blog, address and the topic you want to put.
- And ready. You will have your blog, and different options to edit it to your liking. To publish your first post, just click on the "Publish" button. If you want to edit the template to your liking, click the "Theme" button. If you want to add gadgets to your blog, click on the "Layout" button.

3) Insert custom buttons and your own header
Requirements:
- Have Photoshop or power paint design programs.

Steps:
- First of all, create your own header and adjust to the width of your blog.
 |
You click the "Layout" option and then the "Header" option.  |
 |
| Now you just have to click the "Choose file" option and that's where you look for your image to upload it. If it looks bad and does not fit the width of your blog, you can choose to edit it and make it longer or shorter. You can also remove the option to see the blog title in the header. |
 |
| To do this, click on the "Theme" option and then on the "Customize" option, there you will find an option to edit the width of your blog and check the specific size. So you can know how long your cover should be. There are many programs on the internet to resize your image to the exact measurements.  |
 |
If you want to add buttons and other things you must go to the "Layout" option and then press the "Add Gadget" option in the part where you want to install it. From there you can upload images, add gadgets to know who your followers are, visit counters, a list of pages and many other things.  |
 |
| In the settings option you can add the description to your blog, change the name whenever you want, change the language and many other things. That's all you need to know about this platform. |
This would be all in this introductory guide to blogging. If you have questions, comment and I'll be happy to help you. Also on the internet you can explore many more interesting gadgets that you can put on your blog. I hope and you are very successful as a blogger!

No more to say thank you for reading this post and do not forget to keep watching the guides, post, secrets and many more things that are on the blog.
!Comment, Share and Enjoy!
!See you in the next post!
#WaddleOn 


No comments:
Post a Comment